vMix Control Surface is an optional hardware control surface for vMix that connects via USB.
The following is a User Guide that describes the capabilities of each of the buttons and controls.
Visit http://www.vmix.com/controlsurfacedownload/ to download the latest drivers.
Run the installer and accept the prompts to install. Once installed, verify you have the latest version of vMix.
vMix Control Surface is compatible with all installations of vMix version 15 and beyond.
Plug in USB cable from vMix Control Surface to Computer. The lights should flash briefly indicating the unit is receiving power over the USB connection. When using the Control Surface, it must be plugged in prior to opening vMix in order to be recognized. If you plug the unit in while vMix is running, you may need to restart vMix to recognize the Control Surface is connected.
The Control Surface uses an industry standard cross point layout consisting of Preview, Program and Overlay keys.
Each input in vMix has a number next to the input name. These correspond to numbers on the Overlay, Program and Preview rows on the Control Surface.
The Control Surface provides access to the first 12 inputs. Inputs can be dragged and dropped in vMix to position the most frequently used sources for use by the control surface.
Press the number of the input on the Preview row that you want to assign to Preview.
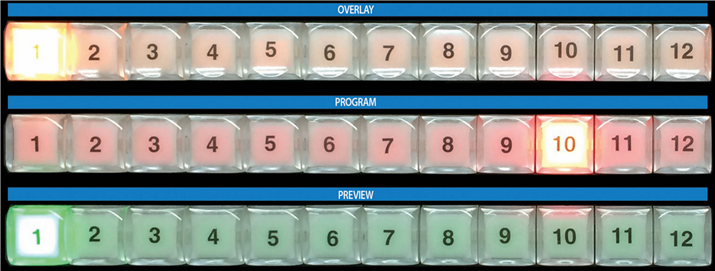
Press the number of the input on the Program row that you want to assign to the Program or Output.
This will cut or take the input directly to output without any transitions.
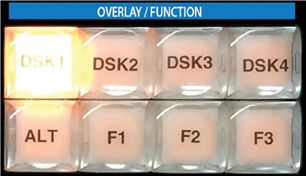
In vMix, graphics placed on top of other sources are known as Overlays. These are also known as Down Stream Keyers (DSK) because the graphics are usually “keyed” over live video after any upstream effects are applied. The DSK buttons on the Control Surface correspond to the 1 through 4 numbers underneath each input in vMix (see graphic on page 1).
1. Select the Overlay channel you wish to use. Example: if you want to overlay an input on channel 1, press the DSK1 button. It will now light up indicating overlay channel one on the first 12 inputs is ready to be used.
2. Press the desired input you wish to overlay. Example: if you have a lower third title in input 6, press button 6 on the Overlay row. Button 6 will then light up indicating that input 6 is overlaid on channel 1 of the chosen input.
3. To see which inputs are currently active on each overlay channel, you can cycle through the 4 DSK buttons. If an overlay channel has an active input, the corresponding input will light up.
1. To program the Function buttons, open up the settings window in vMix and click the Shortcuts tab.
2. Click Add and a new window opens, with drop down menus showing usable keys and available vMix shortcuts.
3. Click the Key drop down and scroll down to SurfaceF1, SurfaceF2, SurfaceF3. These correspond to the F1, F2 and F3 keys on the Control Surface.
4. Select the desired Function. Example: if you wanted a button to start recording, select Start Recording.
5. Press Ok and the selected function button is now ready to be used.
The ALT button can be held down in conjunction with other buttons in order to change their functionality.
This will allow enhancements to be added to future updates of vMix.
It presently operates as follows:
1. Hold down ALT while pressing a Preview row button to start playing that input if it is a video clip.
2. Hold down ALT while pressing one of the Overlay row buttons to turn on that overlay in the Preview window instead of directly to Program/Output.
During the next transition the previewed Overlay will automatically be activated over the top of Program/Output.
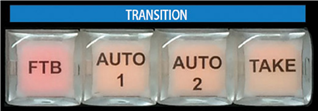
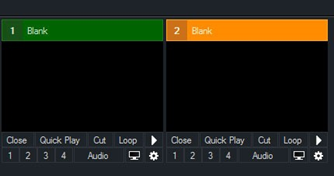
In live switching, changing from one camera or clip to another is called a transition. The vMix Control Surface has three available transition types available, corresponding to transition buttons in vMix.
1. For a hard cut between two inputs, press the “Take” button
2. To use a stylized transition such as a wipe, fade or zoom, there are customizable transitions located at the top of the vMix interface. “Auto 1” and “Auto 2” correspond to the first two transitions below Cut. When these transition types are changed in the vMix window, the transition will also change for the buttons.
3. Press “FTB” to fade the live output to a black screen. (Fade To Black)
By default, the T-Bar allows a manual fade transition between Preview and Program.
The transition effect is linked with the Auto 1 and the first transition button in the vMix interface. If this button is changed from Fade to Wipe for example the T-Bar movement will create a wipe transition instead of a fade.