
« Back to Knowledge Base
Once you have created a new Zoom scheduled meeting, return to the Zoom Setup window in vMix.

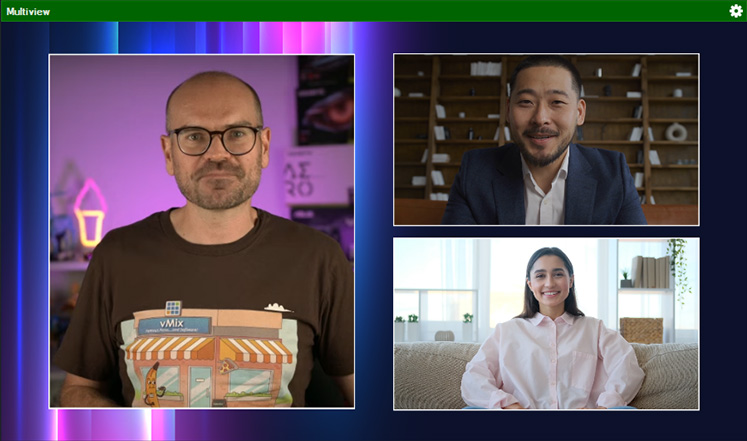

How to create a Zoom Meeting in vMix
Below is a Quick Start tutorial video on how to setup a Zoom Meeting in vMix.
See our documentation / help guide for full information on how to use Zoom in vMix: https://www.vmix.com/help27/Zoom.html
For a step by step guide on how to create a Zoom Meeting call in vMix by either hosting or joining a Zoom Meeting, please skip below.
Quick Links
- Step 1 - Installing the Zoom Plugin
- Step 2 - Adding the Zoom Input
- Step 3 - Opening the Zoom Setup window
- Step 4 - Zoom Setup 1 - Login to Zoom
- Step 5 - Zoom Setup 2 - Join a meeting
- Step 6 - Zoom Setup 3 - Host a meeting
- Step 7 - Zoom Setup 4 - Other meeting settings
- Step 8 - Connect Zoom Input to meeting
- Step 9 - Zoom Manager Window
- Step 10 - Adding more Zoom participants to your meeting
- Step 11 - Changing Zoom participant source
- 12. Advanced Settings
- Full Length Zoom Tutorial Video
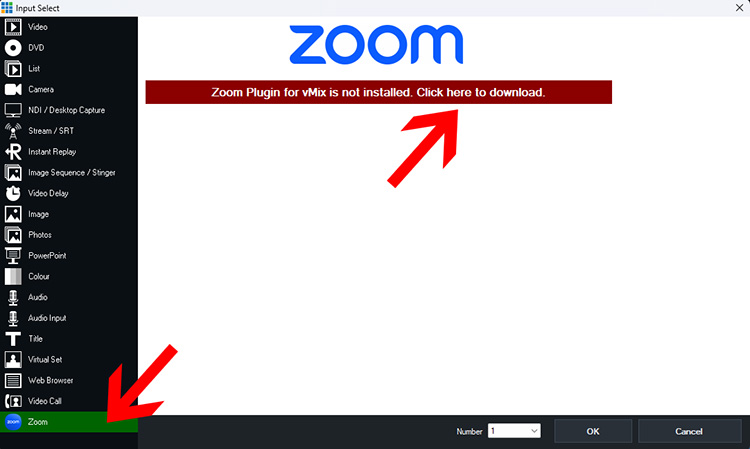
Step 1 - Installing the Zoom Plugin
If using the Zoom input in vMix for the first time, you will be prompted to install the Zoom plugin for vMix. In vMix go to Add Input, select the Zoom tab, then select the banner to go to the download link.
This will send you to the following knowledge base article which contains the link to install the Zoom plugin for vMix:
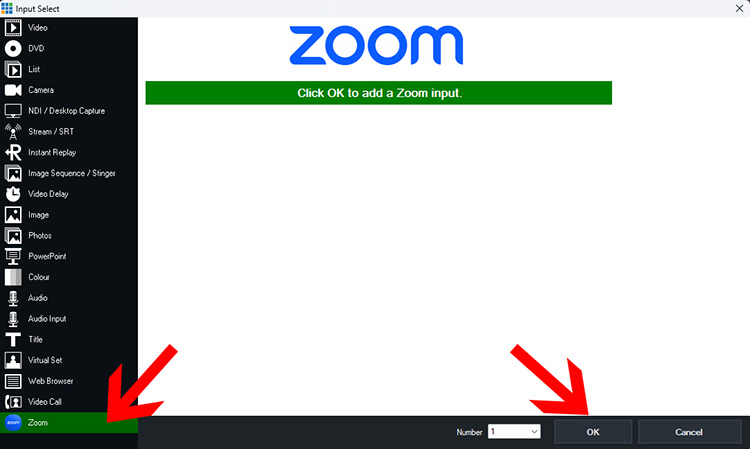
Step 2 - Adding the Zoom Input
After installing, re-open the Add Input menu, select the Zoom tab, then click OK to add a new Zoom input.
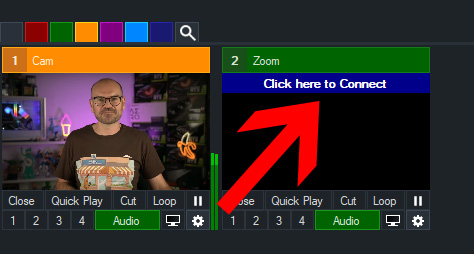
Step 3 - Opening the Zoom Setup window
Click on the blue banner that appears at the top of the Zoom input titled "Click here to connect" to configure your Zoom Meeting settings.
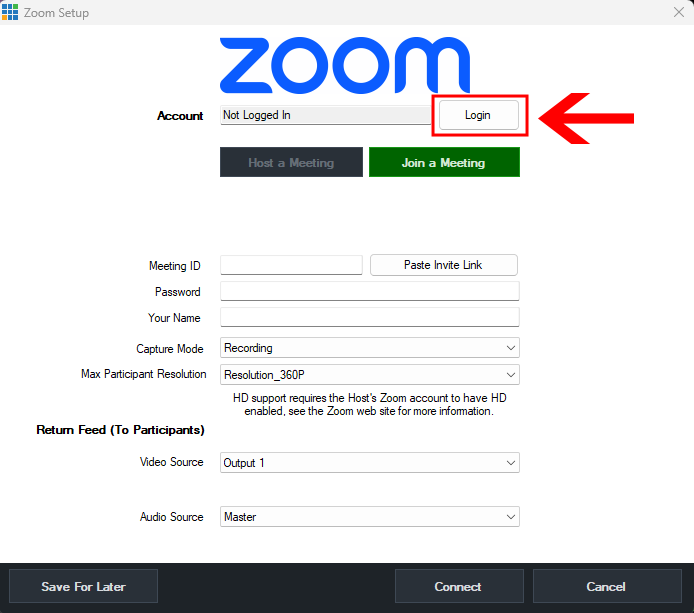
Step 4 - Zoom Setup 1 - Login to Zoom
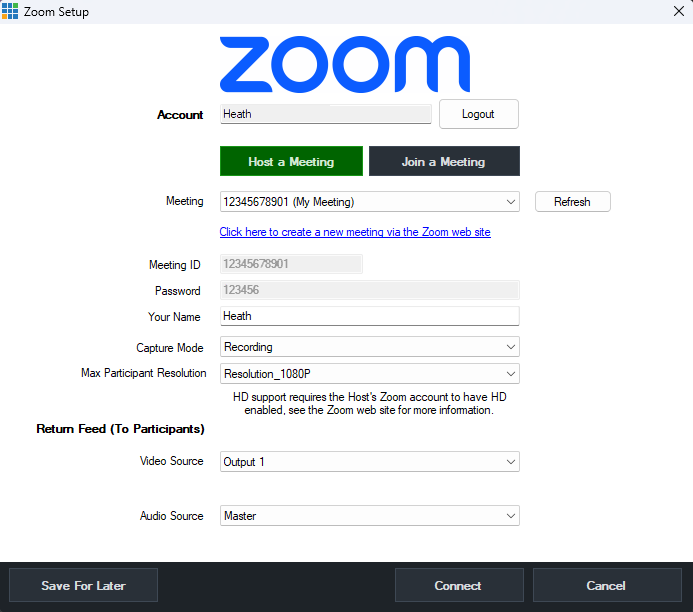
A Zoom Setup window will open where you can choose to either Join a Meeting or Host a Meeting. At the top, you can select to login to your Zoom account. Whilst it isn't mandatory to be logged in to join a meeting, it is recommended. Otherwise if you wish to Host a meeting you do have to login first. So start by selecting the Login button.
This will launch the Zoom website in your default browser. Follow the steps to login until you receive a confirmation that the login process is complete. After that, return to vMix.
Step 5 - Zoom Setup 2 - Join a meeting
You should now see your account name logged in at the top of the Zoom Setup window. The following are steps to Join a Meeting.
1) In the Meeting ID field, fill in the Zoom meeting ID provided to you by the host. Alternatively, click the Paste Invite Link button.
2) In the Password field, fill in the Zoom meeting password provided to you
3) In the Your Name field, fill in your name as you would like it to display to the Zoom host and other Zoom participants
The remaining settings we will cover in Step 7 as it applies to both Hosting a meeting and Joining a meeting. Click here to skip to Step 7. Otherwise proceed to Step 6 to see Host a Meeting instructions.
Step 6 - Zoom Setup 3 - Host a meeting
The following are steps to Host a Meeting.
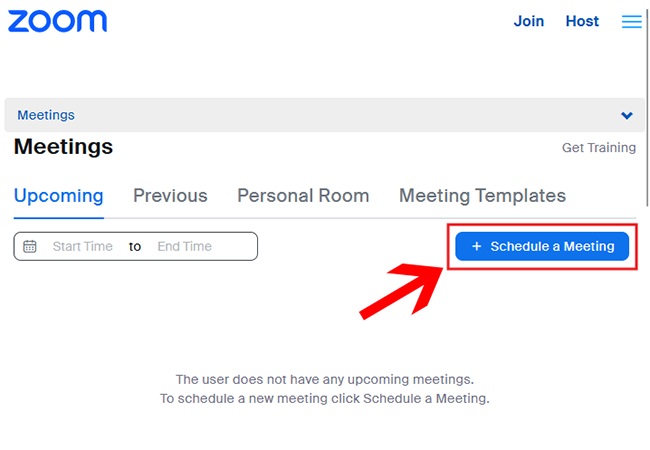
1) Select the Host a Meeting button. Underneath this a dropdown menu will appear which contains any existing scheduled Zoom Meetings you have already created in your Zoom account. You can either select an existing meeting, or click the link below that to Create a new meeting via the Zoom website. Choosing this will launch your account on the Zoom website where you can then select the Schedule a Meeting button. After that fill in the Meeting settings you require and click save. (if you are unsure about any of the meeting setting options, please refer to the Zoom documentation).
Once you have created a new Zoom scheduled meeting, return to the Zoom Setup window in vMix.
2) Select the dropdown menu to choose your scheduled meeting. Note: we recommend clicking the Refresh button first if you have only just recently created the meeting. Once your meeting is selected, below this are some settings we need to configure.
Meeting ID and Password: These will be pre-filled based on the scheduled meeting you choose from the menu
Your Name: Fill in your name as you would like it to display to the Zoom participants
Please proceed to Step 7 for an explanation on the remaining settings.
Step 7 - Zoom Setup 4 - Other meeting settings
The following are the remaining settings required to setup your Zoom meeting:
1) Capture Mode
The capture mode is the Zoom feed you use to connect vMix to a Zoom Meeting. This can either be Streaming or Recording. If you do plan to record your Zoom meeting in vMix, we recommend selecting Recording. If you plan on Streaming your Zoom meeting in vMix, select Streaming. Both options will alert your fellow Zoom participants upon joining the meeting that they are either being Recorded or Streamed.
Even if you do not plan to record nor stream, Zoom requires you to still select one of these capture modes. So either can be selected.
Limitations: If you have local recordings enabled in your zoom meeting settings then you will have to select Streaming as the Capture Mode in vMix to avoid conflicts. Similarly, if you have enabled streaming in your Zoom meeting/app you will need to choose Recording as the Capture Mode. Note these are settings specific to Zoom only. We recommend using vMix to record or stream instead.
2) Max Participant Resolution
Select the maximum resolution you would like the Zoom caller to send to vMix. Do note that the resolution they do send will depend on whether their account has access to it or not. Free accounts have SD quality whereas higher paid accounts have access to other HD resolutions. If you do have a paid account, HD support still needs to be enabled for a group meeting in your Zoom settings. Please see Zoom documentation for further guides on this.
3) Return feed (To Participants)
Video Source: The Output source from vMix you wish to send back to your Zoom participants. By default this is Output 1 which is your main Output in vMix. In vMix 4K, Pro and Max you can select from up to 4 Output options configured via the Outputs section of vMix under Settings.
Audio Source: The return audio source your Zoom participants will hear from vMix. By default this is the Master audio in vMix. Alternatively, if you enable any Audio Buses from the Audio Outputs settings, these will be available to choose from as well. Do note this cannot be changed after creating the Zoom input and cannot be individually configured for each Zoom participant.
Once all the settings have been configured click Connect to begin connecting to the meeting.
Optionally click Save For Later if you only wish to save the settings but not connect to a meeting at this time.
Optionally click Save For Later if you only wish to save the settings but not connect to a meeting at this time.
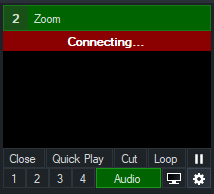
Step 8 - Connect Zoom Input to meeting
If you have selected the Connect button, the Zoom input will show a red Connecting banner until it has connected. It will then appear blank/black if no participants have joined yet.
Before we get into showing Zoom caller participants, we'll have a look at the Zoom Manager window.
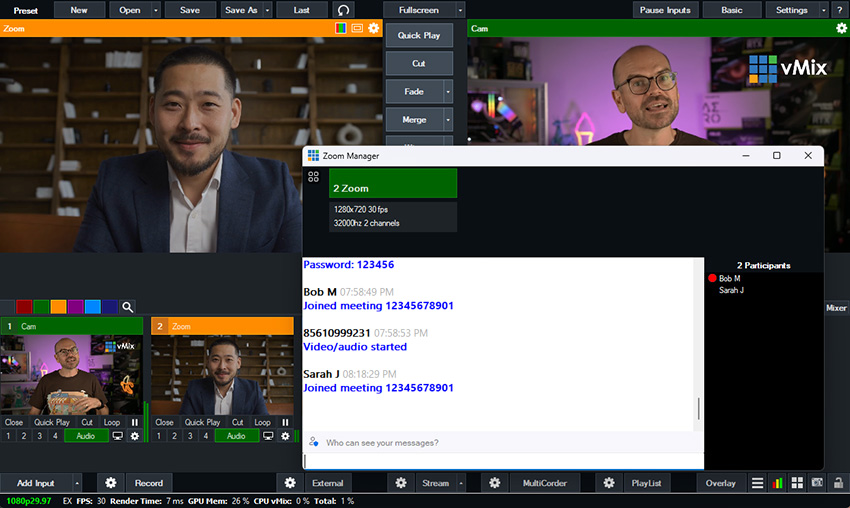
Step 9 - Zoom Manager Window
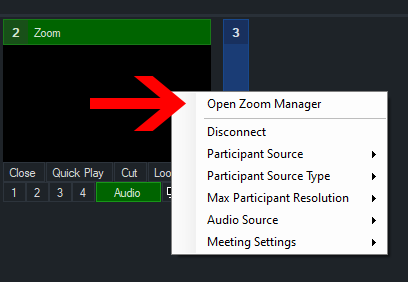
To access the Zoom Manager window, right click the input and select Open Zoom Manager.
In this Window we have the following elements:
Top: This is where statistics on each Zoom participant will appear once connected. Including the resolution and frame rate they are sending.
Bottom Left: At the start of the meeting, the Zoom Meeting connection details will appear here which can be given to other Zoom particpiants to connect. This is also the Zoom chat window. You can see what other Zoom participants are typing into their chat. Or you can also communicate back via the field at the bottom.
Right: Once zoom participants connect, they will appear in this list.
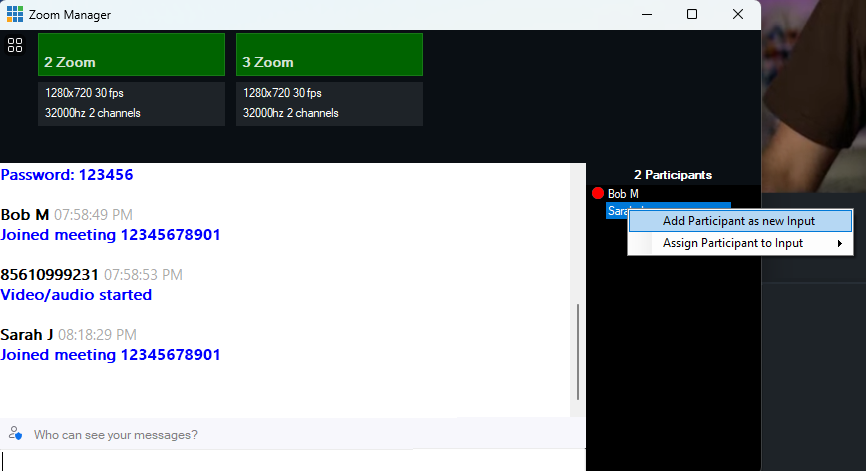
Step 10 - Adding more Zoom participants to your meeting
Once Zoom participants start joining we can see them either in the Zoom Manager window or by going to right click on any Zoom input in vMix and selecting Participant Source.
If you know you will have multiple Zoom participants in your production, it is good to get a few Zoom inputs ready to go before hand. But we can also add Zoom inputs as we need them.
In this example, two Zoom participants have joined and I can see them in my Zoom Manager. By default, the first person who joins first will display in the Zoom input first. Only those participants already assigned to a Zoom input will have a red circle next to their name.
We can see another Zoom participant called Sarah has joined. I have only got one zoom input added, so I will need to add another one for Sarah. I can do this either by going to the Add Input button, selecting the Zoom Tab then press OK. Or alternatively, I can also do this from the Zoom Manager window by right clicking the participant's name and selecting Add Participant as new Input. Or alternatively, I can assign them to an existing Zoom input already in my production.
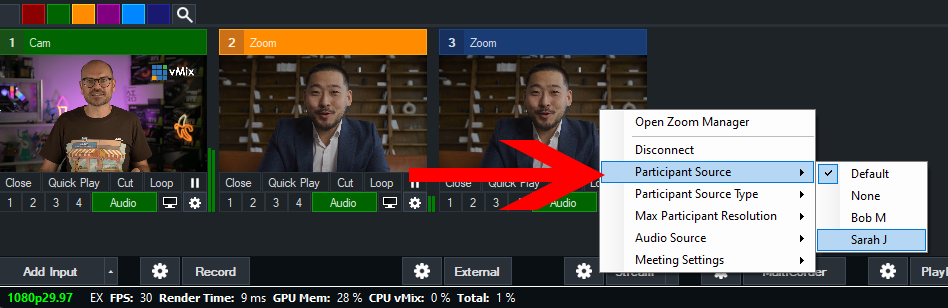
Step 11 - Changing Zoom participant source
If you have chosen to add a new Zoom input via the Add Input menu, then by default it will still show the first Zoom participant that joined. In order to change this to show a different participant, right click the Zoom Input, navigate to the Participant Source option and then select the participant you wish to assign to this Zoom input.
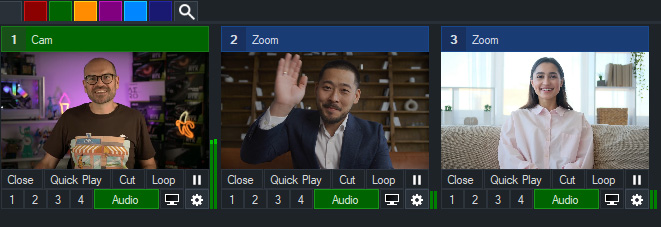
We now have our other Zoom participant added into our production.
We can add multiple Zoom Inputs into vMix for as many participants as we need. Do note however, that Zoom limits the connection to 30Mbps and so as more participants are added, the resolution of participants may reduce dynamically. With our participants added, we can then switch between them in our production just like camera inputs or add them into a Layer Input template, such as this one.
12. Advanced Settings
Below is an explanation of some further settings for Zoom.
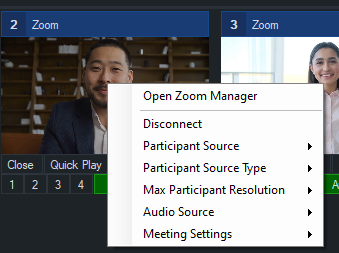
Right Click Menu
Right clicking a Zoom input will give you some additional settings you can choose from.
Open Zoom Manager: Will open the Zoom Manager window as discussed in Step 9.
Disconnect: Disconnects from the Zoom Meeting. The Zoom input will remain in vMix but not connected.
Participant Source: Change the Zoom Caller that appears in the selected Zoom input.
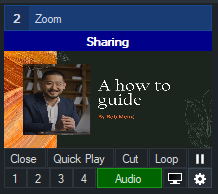
Participant Source Type: Choose from Video, Share or Auto. Video will show the Zoom participant's camera. Share will show the Zoom participant's Screen Share if they are doing one. Auto will automatically switch if they are sharing and when not sharing switch back to their camera. These options are useful in that you can have two separate Zoom inputs with one assigned to their camera and one assigned to their screen share if you would like to do a Layer or Picture in Picture layout etc. When the participant is sharing, a blue sharing banner will appear over the top of input, even if you have chosen Video as the source type.
Max Participant Resolution: The maximum resolution for the Zoom participant in the selected Zoom input. This is the same setting as chosen in your meeting settings in step 7 but can be changed dynamically between participants throughout the meeting. It is important to note that this is still limited by the Zoom participant's resolution capabilities which depends on both their Zoom plan and Zoom settings as to whether they can deliver HD or not. See the Zoom web site for more information on enabling HD support.
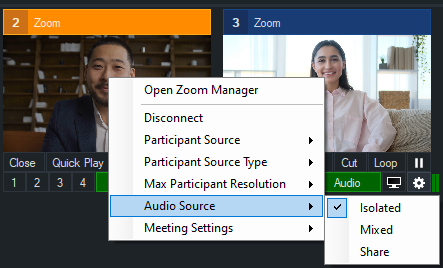
Audio Source: Choose from Isolated, Mixed or Share. Isolated will only have the Zoom participant's audio that is assigned to that specific input. Mixed will have all audio of the entire meeting, this combines multiple participants and is controlled by Zoom. Share will only have the audio from the selected Zoom Input's Screen Share when they are sharing. The use of Mixed is useful if you would like to have only one Zoom audio active and the others turned off.
Meeting Settings: Currently the only option is "Original Sound for Musicians". You can choose to enable or disable this option from here. This adjusts the audio sent from vMix to the Zoom Meetings as follows:
- Reduces noise suppression
- Enables stereo
- Increases audio quality (via higher bitrate)
- Disables echo cancellation
Full Length Zoom Tutorial Video
The following video is a more in depth look at how to use the Zoom input in vMix and covers more of the additional settings than the basic video. If you are looking to get Zoom started quickly, see our Quick Start video at the top of this page.
Last Updated: Monday, January 22, 2024 12:57:38 PM